Project Hooli-Cam: A Do-it-yourself guide to cobbling together your own helmet camera kit.

If you're like how I used to be, then you likely know very little about video cameras or video gear. Likely you find yourself going into stores knowing what you'd like to do but because you don't know the jargon, you are often met with blank stares and a lot of advice that doesn't add up to a video solution. Because I have already suffered through the indignity of asking way too many dumb people even dumber questions, let me be your video guide and show you what you'll need to cobble together a helmet camera system that is fully integrated into your motorcycle's electrical system.


The Video Camera.

There are a number of video formats available for the consumer these days with the Mini-DV format being the most popular at this time. The problem for old-school types like myself, is that although we often know exactly what we want to do, we lack the vocabulary to talk to the video geeks and the information we gather from the video camera manufactures is often presented in such a way that it only makes sense to us after we've become experts ourselves.

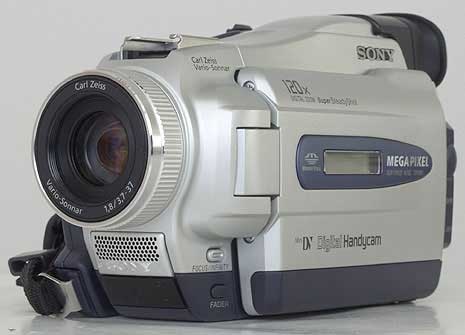
For project Hooli-Cam I purchased a year-old Sony TRV-27 new in the box from Ritz Camera off of Ebay for a song. The Sony is a Mini-DV which is the preferred non-professional format if you're going to do any computer editing before you burn your video to DVD or compress it to share across the web.

Hands down, the best place I've found on the web to learn about all the various video cameras is over at DVspot.com, a site run by Jeff Keller. Jeff's reviews are detailed, layman-friendly, and he provides video and photographic samples of how each camera he has tested works. The best thing about Jeff's site is that he keeps a page with links to every camera that he has tested and reviewed. This comes in handy if you wish to purchase last year's camera inexpensively because it informs you as to what cameras have the features that you're looking for. Take a look at DVspot's camera reviews page and become an expert.


Last year's oohwa-oohwa camera that I bought for a song because it's no longer the latest and greatest.

Jargon you need to know:


The DV port on the camera is really a firewire port. Its only purpose is so that you can transfer your video to your computer and from your computer to your video camera. That is it. The DV port is something you want to make sure your camera has if you're planning on doing any video editing on your computer.

LANC. The LANC port that is available on Sony and Canon video cameras allows you to plug in a "remote control" of sorts to turn your video camera on and off as well as to start and stop recording. Although not necessary, a LANC port is a nice thing to have if you've safely packed your camera away somewhere on your bike. To learn more about what you can do with a LANC port, click here.

Audio/Video in. This is an absolute necessity to have if you're going to run a helmet camera set up. If you buy a used video camera, make sure the special audio/video in cable comes with it. The cable is going to have what looks like a modified 1/8" mini stereo jack on one end and three RCA style connectors on the other end (video, left and right audio).


Typical Input/output of the Sony TRV series. The ports you want to make certain your camera has are the DV, LANC, and Audio/Video in ports.

Mic. The Mic port is useful if you want to run an external amplified microphone. I am running a Radio Shack Amplified Stereo Listener with a foam boot to avoid wind noise (pn: 33-1096).

You should also have kind of software for your computer so you can do non-linear editing and to apply titles and transitions like in the example to the right.

 
This title effect was made using an image editor to place text on a photo. Slick Motion was used to pan across the image and create a movie file. Finally, using iMovie, the "Produced By" text was added on a black background with a cross fade filter, fade out filter and to edit in a sound clip to create the desired effects.


The Helmet Camera
 

Save a bullet camera from a life of drudgery and utter boredom doing security by bringing it for a ride!
 

There are a gaggle of "spy" cameras available on Ebay. Prices are all over the place and it is kind of scary bidding on stuff if you don't know that it will work. Be not afraid: As I came to find out, all of these bullet cameras have as a video output either an RCA plug or a BNC plug. If the bullet camera comes with and RCA style video output then you'll simply jack it into your special video cable that came with your video camera and you'll be set. If the bullet camera comes with a BNC style video out, then you'll need a BNC to RCA adapter. Nothing special, but if you talk to a video geek at the store you'd likely come away thinking that it is rocket science or something.

Even though everybody states that they are using Sony bullet cameras, don't go looking for a bullet camera from Sony because you will not find Sony bullet cameras for less than $1200.00. What Sony does is provide the camera guts and third parties take those guts and make inexpensive bullet cameras out of them. In my case, I am using 1/3" Sony CCDs that have 480 lines of resolution and are mounted in a tough, metal cylinder by some Korean outfit that measures 26 x 75mm. This is the identical bullet camera that comes with all the higher-end helmet-cam kits. I paid $139.00 for mine from CCTV Imports. If you call CCTV Imports, they will hook you up.

Speaking of CCTV Imports, these guys are top-drawer customer service wise. I had to return a bullet camera because something I got was dead in the box and they took care of me. Tell them that "Eric from Minnesota" sent you and you'll get the wholesale pricing. Wholesale pricing is a good deal and is less than what you will see if you simply browse their web site, so be nice to them.

Speaking of good deals, I ordered a couple of items from Helmetcamera.com. Because I called them and didn't place my order over the web, I saved 27%. Keep that in mind when you're picking up "accessories."

Supplying Power to Your Bullet Cam


Does this guy look like he wants to mess around changing out batteries?
 

Your bullet camera is going to need a 12 volt power source. The pro kits often come with some kind of box that takes enough AA batteries to power up the bullet camera. The pro kit power supplies work and are necessary if your goal is to helmet cam while riding some little pedal bike. But I for one don't ride a pedal bike-I ride a motorcycle and I don't want to mess around changing out batteries or standing in line at SAM's club buying the stupid things in bulk.

Because my video and bullet cameras are 12 volt electrical devices that have an operating tolerance of 8-15 volts, my solution is the wire the whole kit and caboodle into my motorcycle's electrical system and be done with it! Let me show you how it is done!


Inventory:

1) Bullet Camera
2) Radio Shack supplied AC adapter cable end
3) Special video cable that came with your video camera
4) Video adapter (if needed) to adapt the bullet cam's video signal

Apart from a length of 20-gauge wire in black and red and a video camera or video recording deck, this photo shows everything you'll need to get to cobble together your own basic helmet camera. In addition to using the motorcycle's electrical system to power the bullet camera itself, I am using my motorcycle's electrical system to supply power to the recording decks as well.


The first picture shows how I mounted my 12 volt power point which looks just like a cigarette lighter socket. You can buy one made for motorcycles that comes with a mini fuse holder for $30.00 off of the web or you can be like me and run down to Radio Shack and buy a cigarette lighter power socket and an inline mini-fuse for $6.50.

More ambitious types may be inclined to yank the cigarette lighter out of their car but they should be aware that the fuse box the cigarette lighter is connected to is a bit chunky.

I used the less expensive Black & Decker version of the Dremel to hog out a hole for the 12 volt power port. Remember to think before drilling because like diamonds, a hole is forever. Here I had to leave enough space so as to accommodate my foam and the camera's 12 volt power plug.

As you can see in the second picture I had no reservations against flexing the tar out of the wires leading to my CDI. Should my bike suddenly stop running, now you and I both know the first thing I'll be checking.


I used a foam cutter to cut and shape the foam I used to protect my Mini-DV video camera from rattling around in my bike's trunk. You could use a scissors or a sharp carpenter's knife but I'm advanced and have the right tool for cutting and shaping foam.

Should you want to be able to impress and amaze your friends with weird tools they do not have, know that foam cutters are available from any good hobby store for around $30.00.

Primitive Pete types can impress their friends by heating a thin wire stretched between tongs and cutting away.

Neanderthals can just save up enough Styrofoam packing material and use that to protect their camera from vibration and hard knocks.


Here you see the rectangular bit of foam I cut out to protect my Mini-DV video camera. The foam is cut over-size so that it forms a cocoon around the video camera.

You can also see the 12 volt DC adapter that feeds my video camera. This way, I can turn my video camera on and leave it on without fear of wearing down the battery.


Because I knew that I'd be getting into doing video stuff, I bought a bike that has space for two video cameras or two video recording decks in the trunk. In this photo, you see a second bit of foam I use to separate the two cameras.

Running two recording decks for multiple camera angles is very advanced and you're not likely to share my ambitions--but it did make for some fun at the dealer when I bought my bike:

"130 hp at the rear wheel, huh? That's enough to pull a third gear wheelie at a 120 mph. Now show me the trunk."


You'll need a spool of red and black 20-gauge wire to make the power cable for your bullet camera. In my case the 480 line Sony takes a size M coaxial DC power plug. Don't worry about what power plug your bullet camera comes with as Radio Shack has every DC power plug under the sun. Just bring in your bullet camera and the AC/DC power adapter the camera came with into your local Radio Shack and they'll hook you up with what you need.

When you're at Radio Shack figuring out what coaxial end you'll need to get power from your motorcycle to power up your bullet camera, be certain to use an ohm meter to check for continuity on the ground connection while you're at the store. More than a few coaxial ends look nearly identical and I made the mistake of having to make a second trip to Radio Shack to get the right coaxial end only after I had wired everything in. Don't worry about bringing your own ohm-meter, Radio Shack has them behind the counter to use.

Observant types may note that my 1/3" Sony 480 line bullet camera takes a size M coaxial power plug and not the size K that is pictured.


You'll have to solder your power and ground wires to the DC power adapter. Because I didn't have a third hand to hold the DC power adapter, I drilled a hole into a wood block so as to hold the adapter while I soldered on the wires. A vise would have worked too but the wood block and drill were right there and I was too lazy to get up and walk 20 feet over to my vise.

The little black thing that is slid over the wires screws down on the DC power adapter. If you're anal, you can goober up your connections with a bit of silicone RTV and make the whole affair weather tight. Or, if you're a lazy pragmatist like myself, you won't goober up the connections with RTV because you happen to be out of RTV and the store is a mile away.

  Once your junk looks like this your bench work is finished. Anal types may want to install shrink tubing over the power wires feeding the helmet cam but impatient, lazy types like myself just want to get the installation over with as fast as possible so that they can get back to riding their bikes.

Here you can see how I mounted my CamEye in the gap between the two pieces of my clutch perch. My goal here was to have a small but secure place where I could readily see and use my CamEye LANC controller. For this reason, I've mounted the CamEye so that I can see the CamEye's LED even when I'm covering the red button with my thumb.

To make the mount itself I hacked out of some sheet metal a small 1 1/2" x 1 1/2" square and rounded the corners. I drilled a 1/4" hole in one corner to accommodate the bolt from the clutch perch. I would have painted the mount glossy black to match the finish of my bike's handlebar but all I had was a can of brown spray paint. As usual, because I had the can of brown and glossy black was at the store, my mount got painted brown.

I made certain that my clutch perch was secure with the mount installed. The benefit of mounting the CamEye where I did is that the two halves of the clutch perch serve to stiffen the sheet metal mount. This is a good thing as I had envisioned that the sheet metal I used would slowly bend if it wasn't supported properly.

To secure my CamEye LANC control to my mount I used a strip of 3M Dual Lock™ that I got from Radio Shack (p/n: 64-2360). Think of this stuff as something like Velcro except this stuff "sticks" way, way better. I don't know what 3M developed this stuff for but if you stuck a sheet of it on the top of a tank and on the bottom of a big lift helicopter, you could pick up the tank. The stuff is really strong.

The cable coming from the CamEye wasn't long enough to make the trip from my handlebars, under my fuel tank and seat, to the trunk on my bike. To lengthen it, I used Radio Shack's Hands Free Headset Extension Cable (p/n: 43-2003). It works great!

One last thing to know about the CamEye: When you're not using your CamEye, there is a rubber cap that snaps over it to keep the rain out and the magic smoke in. Handy.

Mounting Your Bullet Cam


I've always felt that showing something that your motorcycle is doing in the camera frame makes for an interesting video experience for the audience. Therefore I wanted a low forward-facing mount that revealed the front wheel and suspension.

This mount I fabricated using a thin sheet of aluminum that I mounted to my bike's timing cover. Because of the potential of vibration, had some reservations about mounting a bullet camera to my engine but a check in the garage showed that vibration wasn't an issue even when I revved up the engine past 11,000 rpm.

A test video made as it was getting dark and cold revealed that the mount should be angled down slightly so as to show the front wheel making contact with the pavement. I believe this will make the camera angle more interesting for the viewers and so a subsequent test video was made to ensure that the road was still in the camera frame while doing wheelies without filling up the frame with nothing but the road while going through right-hand corners.

Observant types will take note that I'm using Helmetcamera.com's aluminum guard. I settled on Helmet Camera's guard because I had concerns that the lens of the bullet camera would be subjected to road-grime and debris and I wanted to protect the camera lens. The guard is one of the "accessories" you can get for less money if you call rather than placing your order on the web. Another thing to know about Helmet Camera's aluminum guard is that you can get different colored lens that you can use as light filters for your bullet camera.

Again I'm using more of the 3M stuff to secure the camera to the mount I fabricated.

Later on I came back and made a much stronger bracket out of sheet metal because the aluminum bracket had started to crack from metal fatigue. I used the aluminum bracket as a rough template and I curved the legs of the bracket using a vise, a 12mm socket, and a hammer. After I had hand-hammered out the bracket, I had the satisfaction of knowing that I had just done more metal fabrication than I'd ever seen on that American Chopper show on TV.

The bracket ended up being extremely sturdy. I was so pleased with myself that I got off my duff and went to the store and purchased a can of glossy black spray paint. Unfortunately, because of the weather conditions here in Minnesota, after three hours the paint was still tacky. My solution was to throw the bracket into the oven and set it at 185°F for an hour and half.

Do-it-yourselfer note: Try to ignore the looks and questions from fellow family members when oven-baking your painted bits.

Camera position wise, you can see that I've tipped the camera down a good 20° from level to get the frame angle I wanted this camera to have and the end result is I'm now able to make fun videos.


If you're into supermoto or off-road motorcycling you can mount a bullet-cam to your bike as well.

My supermoto set-up isn't nearly as nice as the bullet-cam set-up on my sportbike mostly because I don't have a trunk to stash the Mini DV camera I use for recording and that forces me to wear a fanny pack with a wire hanging out going to my bullet-cam.

To mount the bullet-cam on my Husqvarna SM510R, I fabbed up a bracket and mounted it to my lower, right-hand triple. The bracket features slots on it so that I can aim the bullet camera up and down. Because all thumpers are paint-shakers, I used Locktite on the 1/4" 20 bolt that holds the bullet camera to the bracket so that it'll resist coming loose.

The bracket itself is a simple bend with the top folder over for rigidity to keep the camera from shaking.

At first glance it appears that I've got the bullet-cam pointing at the ground. but as soon as I get on the bike the camera aims much higher.

My Husqvarna has a 12 volt battery so I supply power to the bullet-cam of off the bike's battery. You can see the switch for turning power on and off in the first photo.


Although I'm still experimenting to find a better way of doing this, the video out from the bullet cam that I plug my Mini DV into in zip-tied between the handlebar risers.


Here is a sample Supermoto video taken from my local practice track. Nevertheless as you get more involved in video you're going to want better editing software, a faster computer with even larger hard-drives to hold all of your video footage and more and better cameras. Getting friends to help create content is also a bonus.


Eric's Motorcycling Do-It-Yourself Page